PDF Publication Title:
Text from PDF Page: 008
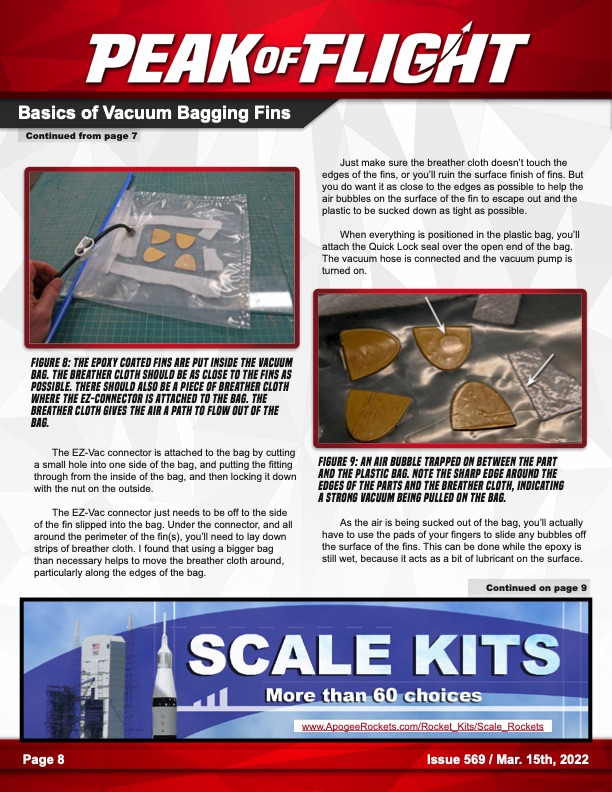
Basics of Vacuum Bagging Fins Continued from page 7 Continued on page 9 www.ApogeeRockets.com/Rocket_Kits/Scale_Rockets Figure 8: The epoxy coated fins are put inside the vacuum bag. The breather cloth should be as close to the fins as possible. There should also be a piece of breather cloth where the ez-connector is attached to the bag. The breather cloth gives the air a path to flow out of the bag. The EZ-Vac connector is attached to the bag by cutting a small hole into one side of the bag, and putting the fitting through from the inside of the bag, and then locking it down with the nut on the outside. The EZ-Vac connector just needs to be off to the side of the fin slipped into the bag. Under the connector, and all around the perimeter of the fin(s), you’ll need to lay down strips of breather cloth. I found that using a bigger bag than necessary helps to move the breather cloth around, particularly along the edges of the bag. Figure 9: An air bubble trapped on between the part and the plastic bag. Note the sharp edge around the edges of the parts and the breather cloth, indicating a strong vacuum being pulled on the bag. As the air is being sucked out of the bag, you’ll actually have to use the pads of your fingers to slide any bubbles off the surface of the fins. This can be done while the epoxy is still wet, because it acts as a bit of lubricant on the surface. Page 8 Issue 569 / Mar. 15th, 2022 Just make sure the breather cloth doesn’t touch the edges of the fins, or you’ll ruin the surface finish of fins. But you do want it as close to the edges as possible to help the air bubbles on the surface of the fin to escape out and the plastic to be sucked down as tight as possible. When everything is positioned in the plastic bag, you’ll attach the Quick Lock seal over the open end of the bag. The vacuum hose is connected and the vacuum pump is turned on.PDF Image | Basics of Vacuum Bagging Fins
PDF Search Title:
Basics of Vacuum Bagging FinsOriginal File Name Searched:
Newsletter569.pdfDIY PDF Search: Google It | Yahoo | Bing
5,000 BF Shipping Container Lumber Dry Kiln For Quality Lumber The 5,000 BF container kiln consists of one 40 foot high-cube aluminum shipping container... More Info
Shipping Container Lumber Dry Kilns by Global Energy Global Energy designed and developed the container kiln back in 1991. The purpose is to give access to portable sawmill owners, furniture makers, and small business the value added profit of dry kiln lumber and quality hardwoods... More Info
Vacuum Kiln Conversion Kit for Lumber and Wood Dry Kilns Convert your existing conventional dry kiln into a fast drying vacuum kiln. Similar to vacuum bagging in the boat building and aircraft industry, we have come up with a proprietary process which allows you to build a very simple vacuum kiln at a fraction of the price, and without the intensive conventional metal chamber structure... More Info
Vacuum Pump Cart System for Bagging Clamping Wood Drying and more Vacuum Cart with 2HP Pump and Dual Pistons with multiple multiplex vacuum ports and liquid reservoir... More Info
Vacuum Bagging Basics Vacuum bagging is a method of clamping, which has traditionally been used in the composites industry, but can also be used for vacuum drying materials, including wood products... More Info
| CONTACT TEL: 608-238-6001 Email: greg@globalmicroturbine.com | RSS | AMP |