PDF Publication Title:
Text from PDF Page: 045
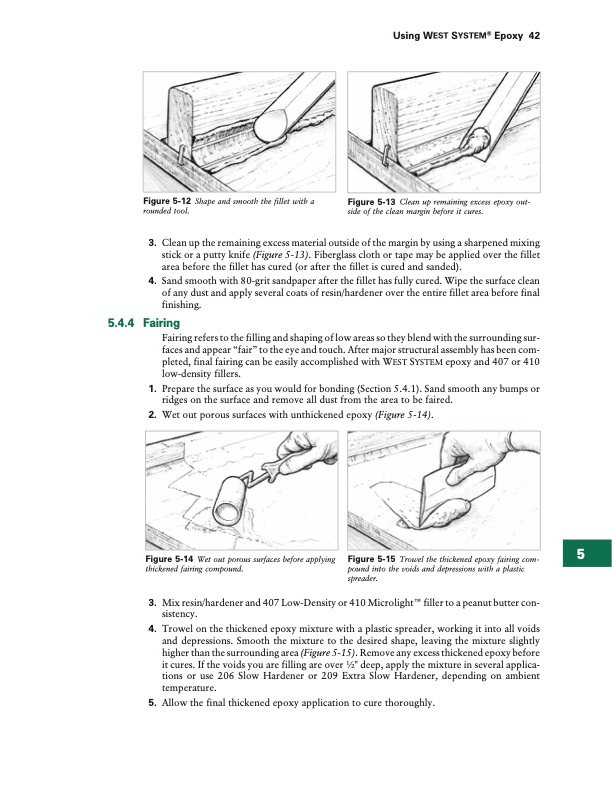
Figure 5-12 Shape and smooth the fillet with a Figure 5-13 Clean up remaining excess epoxy out- rounded tool. side of the clean margin before it cures. 3. Cleanuptheremainingexcessmaterialoutsideofthemarginbyusingasharpenedmixing stick or a putty knife (Figure 5-13). Fiberglass cloth or tape may be applied over the fillet area before the fillet has cured (or after the fillet is cured and sanded). 4. Sand smooth with 80-grit sandpaper after the fillet has fully cured. Wipe the surface clean of any dust and apply several coats of resin/hardener over the entire fillet area before final finishing. 5.4.4 Fairing Fairing refers to the filling and shaping of low areas so they blend with the surrounding sur- faces and appear “fair” to the eye and touch. After major structural assembly has been com- pleted, final fairing can be easily accomplished with WEST SYSTEM epoxy and 407 or 410 low-density fillers. 1. Prepare the surface as you would for bonding (Section 5.4.1). Sand smooth any bumps or ridges on the surface and remove all dust from the area to be faired. 2. Wet out porous surfaces with unthickened epoxy (Figure 5-14). Figure 5-14 Wet out porous surfaces before applying Figure 5-15 Trowel the thickened epoxy fairing com- thickened fairing compound. pound into the voids and depressions with a plastic spreader. 3. Mixresin/hardenerand407Low-Densityor410MicrolightTMfillertoapeanutbuttercon- sistency. 4. Trowel on the thickened epoxy mixture with a plastic spreader, working it into all voids and depressions. Smooth the mixture to the desired shape, leaving the mixture slightly higher than the surrounding area (Figure 5-15). Remove any excess thickened epoxy before it cures. If the voids you are filling are over 1⁄2" deep, apply the mixture in several applica- tions or use 206 Slow Hardener or 209 Extra Slow Hardener, depending on ambient temperature. 5. Allow the final thickened epoxy application to cure thoroughly. Using WEST SYSTEM® Epoxy 42 5PDF Image | Vacuum Bagging Techniques 002150
PDF Search Title:
Vacuum Bagging Techniques 002150Original File Name Searched:
VacuumBag-7th-Ed.pdfDIY PDF Search: Google It | Yahoo | Bing
5,000 BF Shipping Container Lumber Dry Kiln For Quality Lumber The 5,000 BF container kiln consists of one 40 foot high-cube aluminum shipping container... More Info
Shipping Container Lumber Dry Kilns by Global Energy Global Energy designed and developed the container kiln back in 1991. The purpose is to give access to portable sawmill owners, furniture makers, and small business the value added profit of dry kiln lumber and quality hardwoods... More Info
Vacuum Kiln Conversion Kit for Lumber and Wood Dry Kilns Convert your existing conventional dry kiln into a fast drying vacuum kiln. Similar to vacuum bagging in the boat building and aircraft industry, we have come up with a proprietary process which allows you to build a very simple vacuum kiln at a fraction of the price, and without the intensive conventional metal chamber structure... More Info
Vacuum Pump Cart System for Bagging Clamping Wood Drying and more Vacuum Cart with 2HP Pump and Dual Pistons with multiple multiplex vacuum ports and liquid reservoir... More Info
Vacuum Bagging Basics Vacuum bagging is a method of clamping, which has traditionally been used in the composites industry, but can also be used for vacuum drying materials, including wood products... More Info
| CONTACT TEL: 608-238-6001 Email: greg@globalmicroturbine.com | RSS | AMP |