PDF Publication Title:
Text from PDF Page: 023
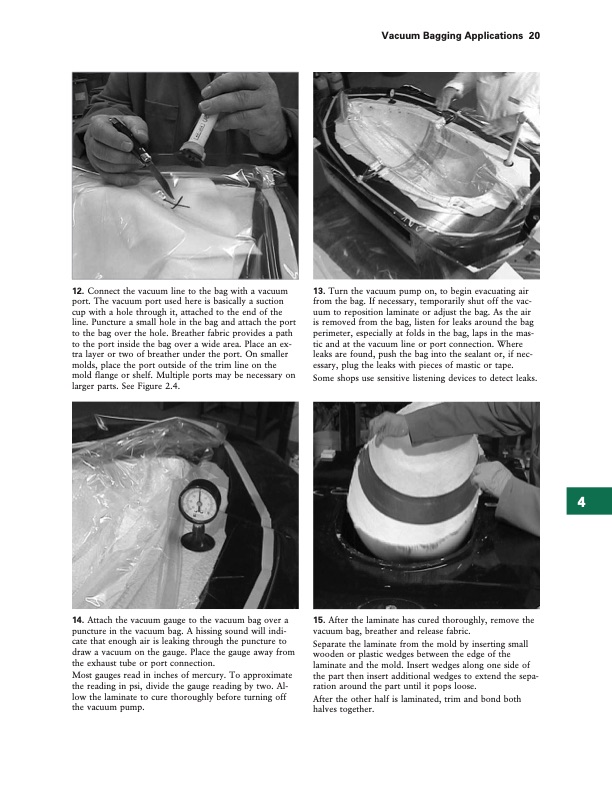
12. Connect the vacuum line to the bag with a vacuum port. The vacuum port used here is basically a suction cup with a hole through it, attached to the end of the line. Puncture a small hole in the bag and attach the port to the bag over the hole. Breather fabric provides a path to the port inside the bag over a wide area. Place an ex- tra layer or two of breather under the port. On smaller molds, place the port outside of the trim line on the mold flange or shelf. Multiple ports may be necessary on larger parts. See Figure 2.4. 13. Turn the vacuum pump on, to begin evacuating air from the bag. If necessary, temporarily shut off the vac- uum to reposition laminate or adjust the bag. As the air is removed from the bag, listen for leaks around the bag perimeter, especially at folds in the bag, laps in the mas- tic and at the vacuum line or port connection. Where leaks are found, push the bag into the sealant or, if nec- essary, plug the leaks with pieces of mastic or tape. Some shops use sensitive listening devices to detect leaks. 15. After the laminate has cured thoroughly, remove the vacuum bag, breather and release fabric. Separate the laminate from the mold by inserting small wooden or plastic wedges between the edge of the laminate and the mold. Insert wedges along one side of the part then insert additional wedges to extend the sepa- ration around the part until it pops loose. After the other half is laminated, trim and bond both halves together. Vacuum Bagging Applications 20 14. Attach the vacuum gauge to the vacuum bag over a puncture in the vacuum bag. A hissing sound will indi- cate that enough air is leaking through the puncture to draw a vacuum on the gauge. Place the gauge away from the exhaust tube or port connection. Most gauges read in inches of mercury. To approximate the reading in psi, divide the gauge reading by two. Al- low the laminate to cure thoroughly before turning off the vacuum pump. 4PDF Image | Vacuum Bagging Techniques 002150
PDF Search Title:
Vacuum Bagging Techniques 002150Original File Name Searched:
VacuumBag-7th-Ed.pdfDIY PDF Search: Google It | Yahoo | Bing
5,000 BF Shipping Container Lumber Dry Kiln For Quality Lumber The 5,000 BF container kiln consists of one 40 foot high-cube aluminum shipping container... More Info
Shipping Container Lumber Dry Kilns by Global Energy Global Energy designed and developed the container kiln back in 1991. The purpose is to give access to portable sawmill owners, furniture makers, and small business the value added profit of dry kiln lumber and quality hardwoods... More Info
Vacuum Kiln Conversion Kit for Lumber and Wood Dry Kilns Convert your existing conventional dry kiln into a fast drying vacuum kiln. Similar to vacuum bagging in the boat building and aircraft industry, we have come up with a proprietary process which allows you to build a very simple vacuum kiln at a fraction of the price, and without the intensive conventional metal chamber structure... More Info
Vacuum Pump Cart System for Bagging Clamping Wood Drying and more Vacuum Cart with 2HP Pump and Dual Pistons with multiple multiplex vacuum ports and liquid reservoir... More Info
Vacuum Bagging Basics Vacuum bagging is a method of clamping, which has traditionally been used in the composites industry, but can also be used for vacuum drying materials, including wood products... More Info
| CONTACT TEL: 608-238-6001 Email: greg@globalmicroturbine.com | RSS | AMP |