PDF Publication Title:
Text from PDF Page: 002
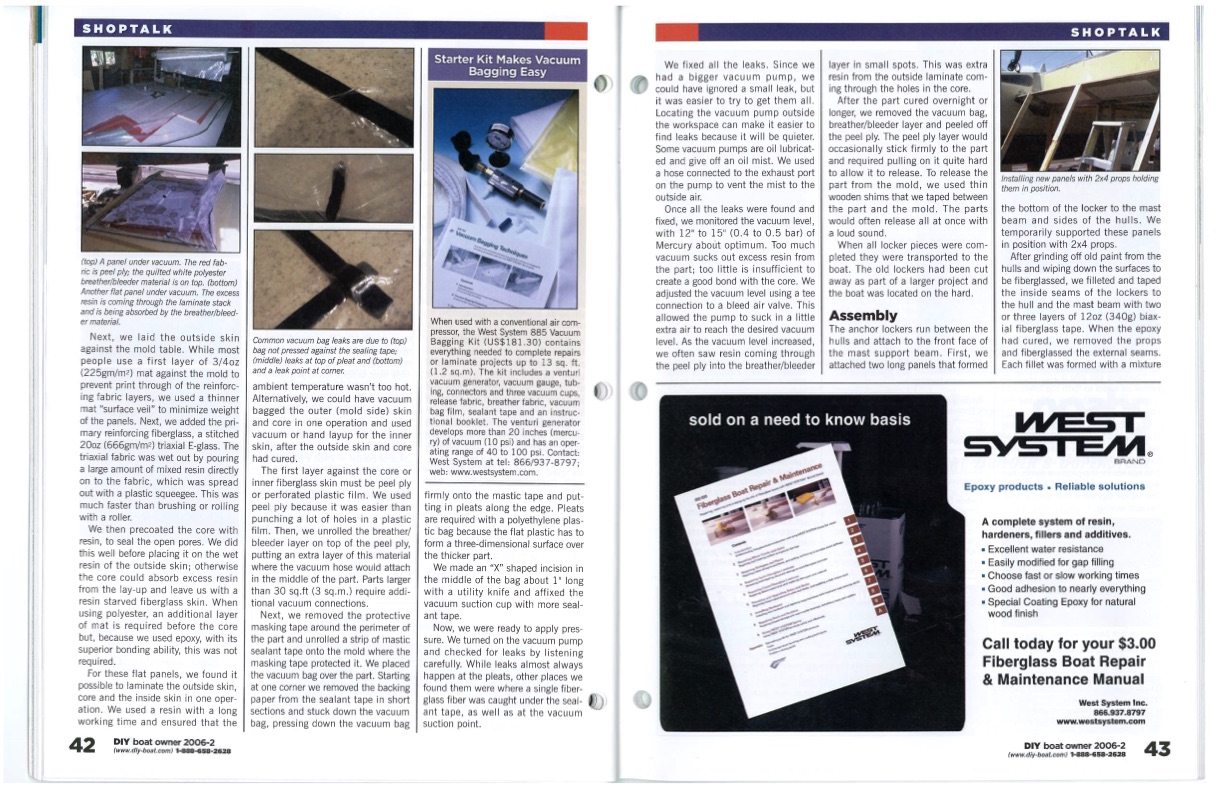
SHOPTALK Wefixedaltheleaks.Sincewe hadabiggervacuumpump,we layerinsmallspots.Thiswasextra resinfromtheoutsidelaminatecom- ingthroughtheholesinthecore. could haveignoredasmall leak,but itwas easier to try to get them al. Locatingthe vacuum pump outside theworkspacecanmakeiteasierto breather/bleederlayerandpeeledoff findleaksbecauseitwilbequieter. Somevacuumpumpsareoillubricat- edandgiveoffanoilmist.Weused ahoseconnectedtotheexhaustport onthepumptoventthemisttothe outside air. Oncealtheleakswerefoundand fixed,wemonitoredthevacuumlevel, with 12" to 15" (0.4 to 0.5 bar) of thepeelply.Thepeelplylayerwould occasionally stickfirmlytothepart andrequiredpullingonitquitehard toallowittorelease.Toreleasethe partfromthemold,weusedthin wooden shims that we taped between thepartandthemold.Theparts wouldoftenreleasealatoncewith a loud sound. Installingnew panelswith2x4propsholding them in position. thebottomofthelockertothemast beamandsidesofthehulls.We temporarily supported these panels inpositionwith2x4props. Aftergrindingoffoldpaintfromthe After the part cured overnight or longer, we removed the vacuum bag, (top)Apanelundervacuum. Theredfab- ricispeelply;thequilted whitepolyester breatherlbleedermaterialison top. (bottom) Anotherflatpanelundervacuum. Theexcess resin is coming through the laminate stack and isbeingabsorbed bythe breatherlbleed- ermaterial, Mercuryaboutoptimum.Toomuch Whenallockerpieceswerecom- vacuumsucksoutexcessresinfrom pletedtheyweretransportedtothe thepart;toolitleisinsufficientto boat.Theoldlockershadbeencut hullsandwipingdownthesurfacesto befiberglassed,we filletedand taped the inside seams of the lockers to createagood bond withthecore. We adjusted the vacuum level using a tee connection to a bleed air valve. This allowedthepumptosuckinalitle Assembly extraairtoreachthedesiredvacuum Theanchorlockersrunbetween the level.Asthevacuum levelincreased, hullsand attachtothefrontfaceof weoftensawresincomingthrough themastsupportbeam.First,we thepeelplyintothebreather/bleeder attachedtwolongpanelsthatformed Eachfiletwasformedwithamixture away as part of a largerproject and the boat was located on the hard. the hul and the mast beam with two orthree layersof12oz (340g) biax- ial fiberglass tape. When the epoxy had cured,we removedthe props Next, we laid the outside skin againstthemoldtable.Whilemost bagnotpressedagainstthesealingtape; people use a first layer of 3/4oz (middle) leaks at top of pleat and (bottom) (225gM/M2) matagainstthemoldto andaleakpointatcomer preventprintthroughofthereinforc- ingfabriclayers,weusedathinner mat "surface veil" to minimize weight ofthe panels. Next, we added the pri- maryreinforcingfiberglass,astitched 20oz(666gM/M2)triaxialE-glass.The W hen used with a conventional aircom- pressor, the West System 885 Vacuum Bagging Kit (US$181.30) contains everythingneededtocompleterepairs or laminate projects up to 13 sq. ft. (1.2sq.m).Thekitincludesaventuri vacuum generator,vacuum gauge,tub- ing, connectors and three vacuum cups, release fabric, breather fabric, vacuum bag film, sealant tape and an instruc- tional booklet. The venturi generator developsmorethan20inches(mercu- ry)ofvacuum (10 psi) and has an oper- ating range of 40 to 100 psi. Contact: WestSystemattel:866/937-8797; BRAND web: www.westsystem.com. triaxialfabricwaswetoutbypouring a large amount of mixed resin directly ontothefabric,whichwasspread outwithaplasticsqueegee.Thiswas muchfasterthanbrushingorrolling with a roler. We thenprecoatedthecorewith resin,tosealtheopenpores.Wedid thiswellbeforeplacingitonthewet resin of the outside skin; otherwise the core could absorb excess resin from the lay-up and leave us with a resin starved fiberglass skin. When using polyester, an additional layer of mat is required before the core but,becauseweusedepoxy,withits superiorbondingability,thiswasnot required. ambienttemperaturewasn'ttoohot. Alternatively,wecouldhavevacuum bagged the outer (mold side) skin and core in one operation and used vacuumorhandlayupfortheinner skin,aftertheoutsideskinandcore hadcured. The first layer against the core or 0 Common vacuumbagleaksaredueto(top) andfiberglassedtheexternalseams. innerfiberglassskinmustbepeelply orperforatedplasticfilm.Weused peelplybecauseitwaseasierthan punchingalotofholesinaplastic arerequiredwithapolyethyleneplas- film.Then,weunrolledthebreather/ Epoxyproducts -Reliablesolutions A complete system ofresin, hardeners, fillers and additives. "Excellent waterresistance "Easilymodifiedforgap filing "Choose fast orslow working times "Good adhesion tonearly everything "SpecialCoating Epoxy fornatural wood finish C alltoday for your $3.00 Fiberglass Boat Repair & Maintenance Manual W est System Inc. 866.937.8797 firmlyontothemastictapeandput- tinginpleatsalongtheedge.Pleats bleederlayerontopofthepeelply, puttinganextralayerofthismaterial where the vacuum hose would attach inthemiddleofthepart.Parts larger than30sq.ft(3sq.m.) requireaddi- tional vacuum connections. Next, we removed the protective masking tape around the perimeter of thepartandunrolledastripofmastic sealanttapeontothemoldwherethe masking tape protected it.We placed thevacuum bag overthe part.Starting atonecornerweremovedthebacking paperfromthesealanttapeinshort ticbagbecausetheflatplastichasto formathree-dimensionalsurfaceover thethickerpart. We made an "X" shaped incision in the middle ofthe bag about 1" long with a utility knife and affixed the vacuum suction cup with more seal- anttape. Now, we were ready to apply pres- sure.Weturnedonthevacuumpump andcheckedforleaksbylistening carefully. While leaks almost always happen atthe pleats, other places we foundthemwerewhereasinglefiber- glassfiberwascaughtundertheseal- anttape,aswellasatthevacuum suctionpoint. For these flat panels, we found it possibletolaminatetheoutsideskin, core and the inside skin in one oper- ation.Weusedaresinwithalong sectionsandstuckdownthevacuum workingtimeandensuredthatthe bag,pressingdownthevacuumbag www.westsystem.com D IY boat owner 2006-2 (www.diy-boat.com) 1-888-658-2628 42 D 1Y boat owner 2006-2 (www.diy-boat.com)1-888-658-2628 A T.PDF Image | Vacuum Bagging Basics Shop Talk
PDF Search Title:
Vacuum Bagging Basics Shop TalkOriginal File Name Searched:
DIY_Vacuum_Bagging_Basics.pdfDIY PDF Search: Google It | Yahoo | Bing
5,000 BF Shipping Container Lumber Dry Kiln For Quality Lumber The 5,000 BF container kiln consists of one 40 foot high-cube aluminum shipping container... More Info
Shipping Container Lumber Dry Kilns by Global Energy Global Energy designed and developed the container kiln back in 1991. The purpose is to give access to portable sawmill owners, furniture makers, and small business the value added profit of dry kiln lumber and quality hardwoods... More Info
Vacuum Kiln Conversion Kit for Lumber and Wood Dry Kilns Convert your existing conventional dry kiln into a fast drying vacuum kiln. Similar to vacuum bagging in the boat building and aircraft industry, we have come up with a proprietary process which allows you to build a very simple vacuum kiln at a fraction of the price, and without the intensive conventional metal chamber structure... More Info
Vacuum Pump Cart System for Bagging Clamping Wood Drying and more Vacuum Cart with 2HP Pump and Dual Pistons with multiple multiplex vacuum ports and liquid reservoir... More Info
Vacuum Bagging Basics Vacuum bagging is a method of clamping, which has traditionally been used in the composites industry, but can also be used for vacuum drying materials, including wood products... More Info
| CONTACT TEL: 608-238-6001 Email: greg@globalmicroturbine.com | RSS | AMP |