PDF Publication Title:
Text from PDF Page: 003
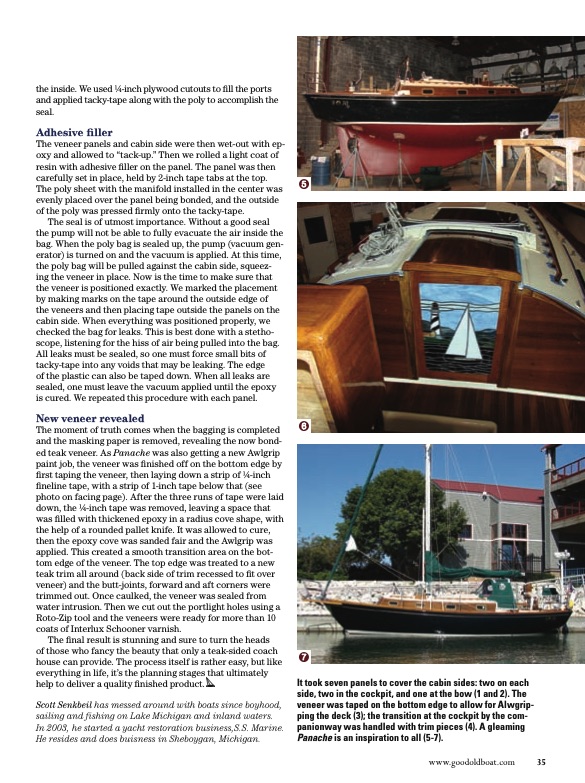
the inside. We used 1⁄4-inch plywood cutouts to fill the ports and applied tacky-tape along with the poly to accomplish the seal. Adhesive filler The veneer panels and cabin side were then wet-out with ep- oxy and allowed to “tack-up.” Then we rolled a light coat of resin with adhesive filler on the panel. The panel was then carefully set in place, held by 2-inch tape tabs at the top. The poly sheet with the manifold installed in the center was evenly placed over the panel being bonded, and the outside of the poly was pressed firmly onto the tacky-tape. The seal is of utmost importance. Without a good seal the pump will not be able to fully evacuate the air inside the bag. When the poly bag is sealed up, the pump (vacuum gen- erator) is turned on and the vacuum is applied. At this time, the poly bag will be pulled against the cabin side, squeez- ing the veneer in place. Now is the time to make sure that the veneer is positioned exactly. We marked the placement by making marks on the tape around the outside edge of the veneers and then placing tape outside the panels on the cabin side. When everything was positioned properly, we checked the bag for leaks. This is best done with a stetho- scope, listening for the hiss of air being pulled into the bag. All leaks must be sealed, so one must force small bits of tacky-tape into any voids that may be leaking. The edge of the plastic can also be taped down. When all leaks are sealed, one must leave the vacuum applied until the epoxy is cured. We repeated this procedure with each panel. New veneer revealed The moment of truth comes when the bagging is completed and the masking paper is removed, revealing the now bond- ed teak veneer. As Panache was also getting a new Awlgrip paint job, the veneer was finished off on the bottom edge by first taping the veneer, then laying down a strip of 1⁄4-inch fineline tape, with a strip of 1-inch tape below that (see photo on facing page). After the three runs of tape were laid down, the 1⁄4-inch tape was removed, leaving a space that was filled with thickened epoxy in a radius cove shape, with the help of a rounded pallet knife. It was allowed to cure, then the epoxy cove was sanded fair and the Awlgrip was applied. This created a smooth transition area on the bot- tom edge of the veneer. The top edge was treated to a new teak trim all around (back side of trim recessed to fit over veneer) and the butt-joints, forward and aft corners were trimmed out. Once caulked, the veneer was sealed from water intrusion. Then we cut out the portlight holes using a Roto-Zip tool and the veneers were ready for more than 10 coats of Interlux Schooner varnish. The final result is stunning and sure to turn the heads of those who fancy the beauty that only a teak-sided coach house can provide. The process itself is rather easy, but like everything in life, it’s the planning stages that ultimately help to deliver a quality finished product. Scott Senkbeil has messed around with boats since boyhood, sailing and fishing on Lake Michigan and inland waters. In 2003, he started a yacht restoration business,S.S. Marine. He resides and does buisness in Sheboygan, Michigan. It took seven panels to cover the cabin sides: two on each side, two in the cockpit, and one at the bow (1 and 2). The veneer was taped on the bottom edge to allow for Alwgrip- ping the deck (3); the transition at the cockpit by the com- panionway was handled with trim pieces (4). A gleaming Panache is an inspiration to all (5-7). www.goodoldboat.com 35PDF Image | Vacuum bagging
PDF Search Title:
Vacuum baggingOriginal File Name Searched:
vacuumbagging.pdfDIY PDF Search: Google It | Yahoo | Bing
5,000 BF Shipping Container Lumber Dry Kiln For Quality Lumber The 5,000 BF container kiln consists of one 40 foot high-cube aluminum shipping container... More Info
Shipping Container Lumber Dry Kilns by Global Energy Global Energy designed and developed the container kiln back in 1991. The purpose is to give access to portable sawmill owners, furniture makers, and small business the value added profit of dry kiln lumber and quality hardwoods... More Info
Vacuum Kiln Conversion Kit for Lumber and Wood Dry Kilns Convert your existing conventional dry kiln into a fast drying vacuum kiln. Similar to vacuum bagging in the boat building and aircraft industry, we have come up with a proprietary process which allows you to build a very simple vacuum kiln at a fraction of the price, and without the intensive conventional metal chamber structure... More Info
Vacuum Pump Cart System for Bagging Clamping Wood Drying and more Vacuum Cart with 2HP Pump and Dual Pistons with multiple multiplex vacuum ports and liquid reservoir... More Info
Vacuum Bagging Basics Vacuum bagging is a method of clamping, which has traditionally been used in the composites industry, but can also be used for vacuum drying materials, including wood products... More Info
| CONTACT TEL: 608-238-6001 Email: greg@globalmicroturbine.com | RSS | AMP |